Saturday, 3 July 2010


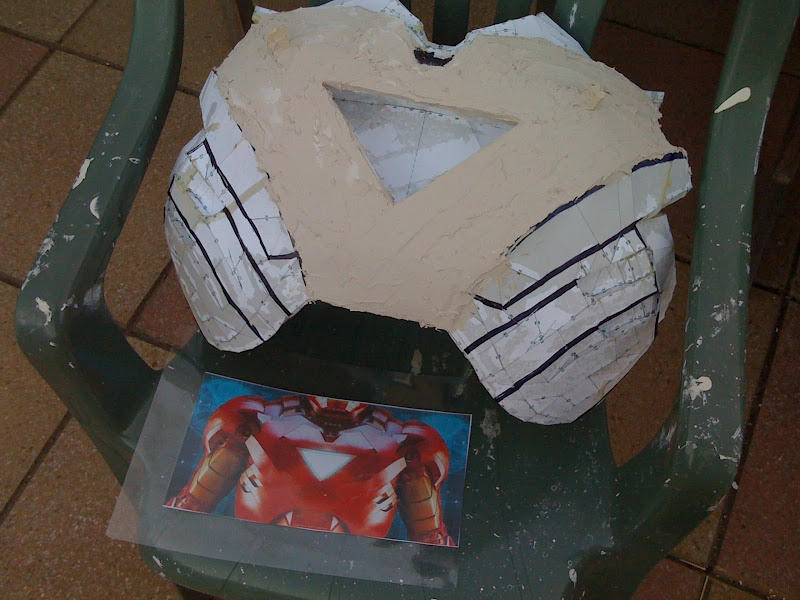
I had some time after work today so I spent a couple of hours adding a little more reenforcement to the chest and then started on the car body filler work.

I made some outlines in marker to help seperate the areas so I can focus on one area at a time.

Jonathan

Sunday, 27 June 2010

Back complete and chest re-enforced


I've now finished the back and managed to re-enforce the chest today.
I first glued a wire hanger into the chest so it would keep it's shape. This worked out really well.

Next step I'm taking is adding the detail to the chest using car body filler.
Hopefully get some done during the week.

Thursday, 24 June 2010

Chest done onto back.

Okay, so I've finished the chest and at first I thought I'd need to rescale it as it didn't seem to sit right. But after referencing some images of the Mark VI I found I was just holding it too low, once in the correct place it looked good.

So I've not moved onto the back and done a fair bit, starting from the spine, moving downwards then upwards. I'm about 40% there and hopefully I can finish it before the weekend.
Pictures to follow.

Jonathan

Tuesday, 15 June 2010

Mark VI has begun!


I've been waiting for a Iron Man VI Pep to come onto the scene since watching the first Iron Man 2 trailer and finally one has arrived.

robo3687 on the siwdat.com forums has provided a well detailed set of Iron Man armors which cover the Iron Man 2 movie suites. These can be found here

So I'm almost done with the Pep work, although I spent a couple of hours prior to Pepping sorting out supports so it would keep its shape during the re-enforcement stage. The total Pep time is going to come to 7 hours and hopefully I can re-enforce it this weekend.

Monday, 14 June 2010

Well I missed a few blog posts :S Sorry!


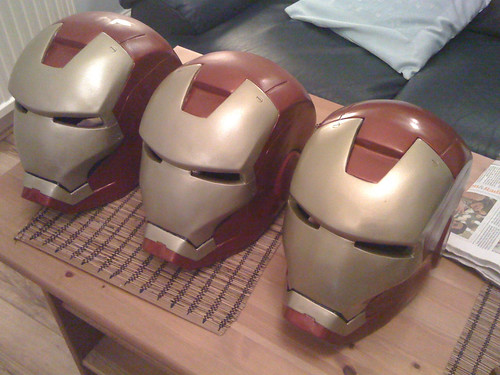
Well I did eventually finish off the mold and have successfully cast a few helmets. Can you spot the difference?
Next step on the helmet front is to make a nice copy for myself and install a set of light up eyes like I did for the master and an electronic system for the faceplate.

If you've not seen the light up eyes yet then check my Flickr photo stream here

I've started moving away from Flickr, and towards Picasa so I'm removing the Flickr gadget on the right because it seems to make the page take ages to load.

Tuesday, 1 December 2009

Keys!

Today I got on with more silicone with thixo and then finally applied the keys. The silicone keys just stick on with a bit of the thickened silicone.
These keys are important as they help align the fiberglass jacket I will be making.

As always check the Flickr stream for more pictures.

Jonathan

-- Post From My iPhone

Sunday, 29 November 2009

Yay for Thixo

With the print layer done I started on bulking it up so it would become stiffer. Problem with this is that silicone is too runny. The solution to this problem is thixo. Thixo is an addiive you can add to silicone to thicken it up.
As always check the Flickr stream for more pictures.

Jonathan

-- Post From My iPhone

Saturday, 28 November 2009

Rubber Time


It's been two weeks since I finished Iron Man so the laquer's had good time to fully harden. So I thought why not begin the moulding work. Last night I had a bit of a play with the silicone rubber to make some keys for later. I had to check the the modelling clay I was going to use wouldn't stop the silicone from curing as some clays contain sulphur which does. Anyway all the keys set fine so today I began.
I started with prepping the helmet with clay and creating a skirt for the silicone to run onto.
I then start the moulding by mixing 200grams of silicone and painting it on. First dabbing the silicone in then using a circular motion to rub it in.

As always check the Flickr stream for more pictures.

Jonathan


-- Post From My iPhone

Sunday, 15 November 2009

It's done!

It's done! It's finally done!
Got a bit of a late start today because I crashed at a mates house last night. But things began well, sprayed a few final coats.
Then masked off the gold chin section, and wrapped a plastic bag over the rest so there was no accidents. I then spray red over the chin, to stop any gold bleeding. Once dried I spray the gold on top, again about 4 coats.
When those coats were drying I was cutting up some screws so I could glue the heads onto the face plate and helmet. I then used the dremel to make some dimples for the screw heads to sit in.
Once all the screw heads were glued in I then sprayed some more spray paint on top.
The last bit of painting was the black paint on the jaw. To do this I sprayed some black spray paint into it's lid and then used a paint brush to apply it.
Once all done I applied three coats of laquer to protect it.

Now for it's public reveal.
As usuall check my Flickr stream for more pictures. I'll take some more of different people wearing it and upload them soon.


Jonathan

Saturday, 14 November 2009

Paint time

Been a miserable cold wet week this week, so I haven't had much time to work on the helmet.

Today I finally got the chance to work on it and it's gotten on very well. Got it finally primed and ready for the paint. Starting with the faceplate I found using these car spray paints takes some patience. You have to spray from a good distance to get a nice even coat. It also looks strange going down as I think it has metallic pieces in it which look like they fizz when they touch the surface.

After a few nice even coats it's looking very close to being done. I still need to dremel some holes for the bolt details but then that should be it.

Check my Flickr photo stream for more photos.

Jonathan


-- Post From My iPhone